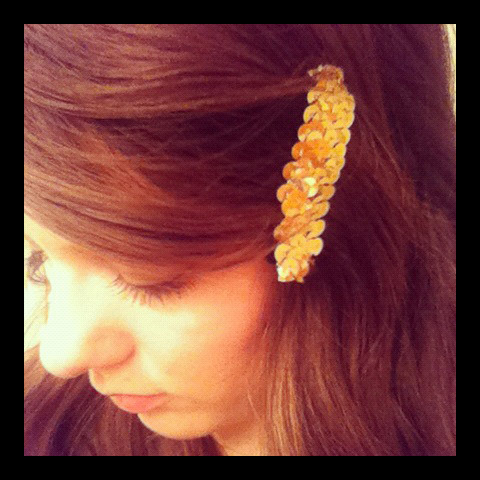
1. Friday, May 4, 2012

    DIY Headband Holder

    Last week The Beauty Department posted a DIY for a headband holder. (You can see it HERE!)

    I thought that it was such a fun idea! My headbands have always been so unorganized. I loved theirs but very quickly realized that that particular headband holder would not work for the majority of the headbands I have.

    I thought about the way they are displayed at Anthropolgie, which is where I get a majority of mine and I saw a necklace holder on Pinterest that quickly inspired this DIY. :)

    SUPPLIES:

    1x4 Lumber | This is what I used for the base. You only need about a 4in piece so check the scrap wood section and you might get lucky. It’s not imperative to get a piece of wood at 1x4. Look around the scarp section and maybe your will see something you like better!

    Dowel Rod | You can sometimes find these in the scrap wood section or with the scrap trim section. I found that a 12-14in section was plenty.

    Tree Branch | About a 1ft section of a straight tree branch is all you need. We found a fairly long branch (about 4ft) and cut the best section off.

    TOOLS:

    Saw* | Only if you want to cut the items yourself. Which we found helpful. Although Home Depot is always there to help you cut anything you buy from them.

    Power Drill | Cordless or corded drill will work fine.

    Wood Glue | Not necessary, but does help strengthen everything.

    STEPS:

    1. Drill a hole 3/4s of the way into the 1x4, this will be your base. Drill another hole 3/4s of the way through the tree branch. The drilled holes should be proportional to the dowel rod you choose.

    2. Put the Dowel Rod in the block of wood. This is where a little wood glue will help make it sturdy!

    3. Now attach the tree branch to the dowel rod. Again, wood glue helps…

    4. Do a little Dance! Because you are done!! See how easy that was?! Now you can enjoy your new headband holder!

  2. Saturday, March 17, 2012

    How To | Nail Polish Rings

    I am so excited to post my first video tutorial. I thought this would be a fun and simple tutorial to start off with.

    I hope you enjoy these instructions on how to make a Nail Polish Ring. :)

    I was inspired by some rings I found on Pinterest that had a piece of marble over them so I thought this would be so fun to do with some of my own favorite nail polishes.

    I love the roughness of just leaving it as the nail polish. What do you think? Will you be trying this?

  3. Thursday, January 5, 2012

    DIY | Ban.do inspired Hair Clips

    I have loved the ban.doJumbo Party Bobbi” ever since I laid eyes on it. I loved the simplicity of it. However, I couldn’t ever bring myself to spend $15 (which really isn’t THAT bad) on something I could make myself and get more than just 1 clip.

    So then began my trip to Hobby Lobby…I got everything I needed for just a little over $4*!!! I was able to make 5 hair clips. So here is how YOU can make your own:

    *(Glue and scissors not included. I already had those at home.)
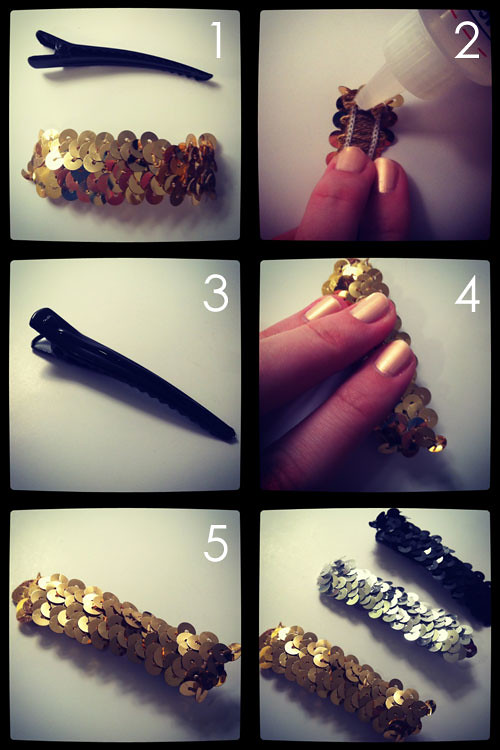
    What you will need:

    Scissors
    Sequined ribbon
    Hair clip
    Fabric Glue
    Epoxy Glue (or hot glue, or you can use the same fabric glue. Epoxy just has a super strong hold that I like. But be warned it’s super smelly at first!!)

    STEPS:

    1 | Cut your ribbon to the length of your hair clip. Mine was about 2 inches.

    2 | Using the fabric glue, glue down the loose strings at at the ends of your sequins so they will not fly away. (I’m sure normal people would sew but I just find fabric glue so much easier!) Wait about 3-5 minutes for the edges to dry.

    3 | Put a line of glue down your hair clip. Make sure not to put too much, you don’t want to glue your clip shut. :)

    4 | Place the sequined ribbon on your clip and hold it for about 30 seconds to make sure it stays in the correct place. The epoxy I used says it takes 5 minutes for it to dry completely so wait at LEAST 5 minutes.

    5 | &&Voilà!!! The hair clip is complete! Simple right? You can make as many of these as your heart desires in whatever color you want. They are so fun and they can dress up any outfit.


UA-10245658-14